Introduction
The conversion of HTML into Word is one of the most requested functionalities of xmldocx.
Since v1.0 xmldocx offers pretty sophisticated ways to include HTML formatted content into a Word document. The purpose of this tutorial is to offer a detailed account on how one can do it and how to get the most of it.
There are currently two elements to include HTML into a Word document generated from scratch (the case of templates will be treated further below) with phpdocx:
- pdx:addExternalFile
- pdx:embedHTML
The first of them uses internally the “alternative content” element available in the OOXML standard (on which Word is based) and it is simple to use although it has two main drawbacks:
- It is not compatible with Open Office and/or PDF conversion.
- There is no much flexibility in the rendering options.
This said, it may be an interesting option if none of the above represents an issue for a given application.
In what follows we will concentrate in the pdx:embedHTML element and the replaceVariableByHTML (its avatar for working with Word templates).
The main advantages of the pdx:embedHTML element are summarised in:
- The HTML code is translated into native WordML code so the resulting document may be rendered in Open Office and transformed to PDF with the help of the phpdocx conversion plugin (included in the Pro+ and Advanced versions of the library).
- One may use native Word styles for paragraphs and tables.
- One may include the images included in the HTML code within the Word document or as external resources.
- If there are headings thay may get included into a Table of Contents.
- It allows for the direct insertion of HTML+CSS code or the embedding an preprocessing of an external web page.
Let us now get down to the nitty-gritty.
Basic Examples
Let us first offer a few simple examples that illustrate the basic procedures:
Simple HTML code
The code needed to insert some plain HTML is as simple as this:
config.xml
content.xml
settings.xml
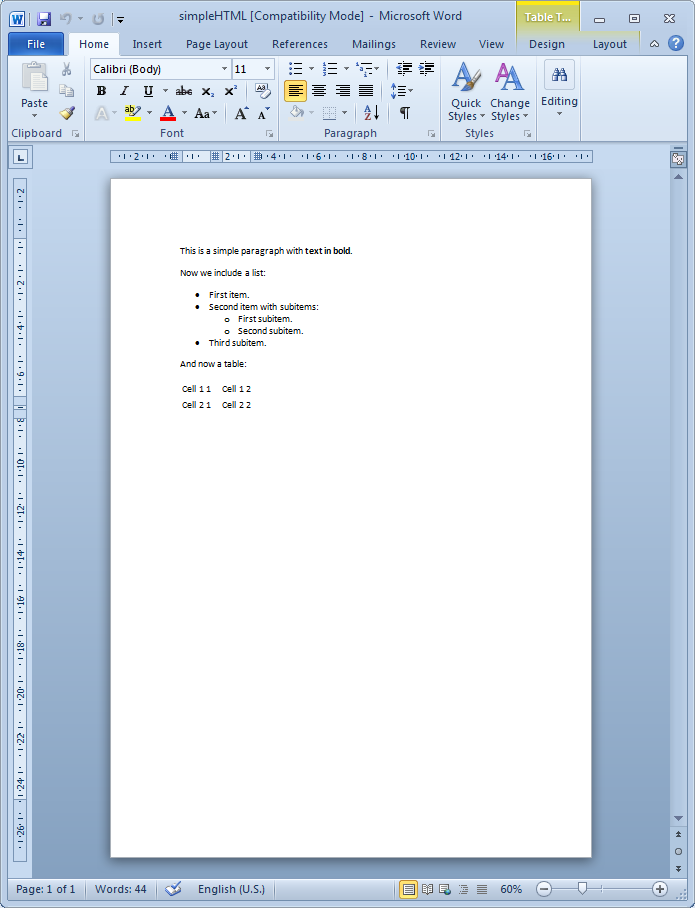
![]() And you will get as a result (download the corresponding document):
And you will get as a result (download the corresponding document):
config.xml
content.xml
settings.xml
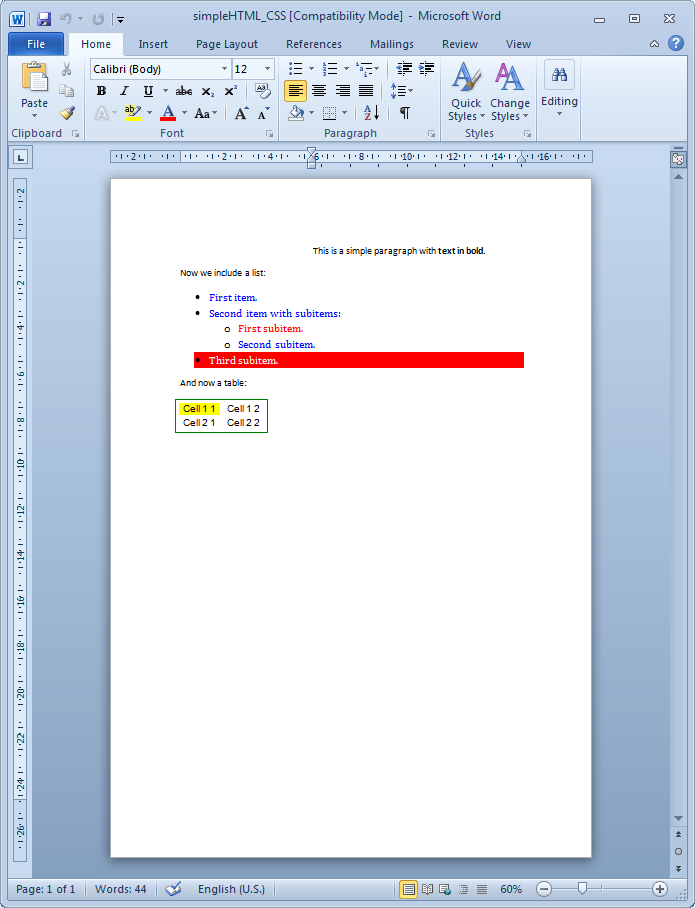
![]() And you will get as a result (download the corresponding document):
And you will get as a result (download the corresponding document):
External HTML source
Sometimes one may need to get the HTML and CSS from existing external files but as we will now show this also turns to be extremely simple.
Let us assume that the HTML code above proceeds from an external html page: simpleHTML.html that links to a CSS stylesheet: styles.css.
Then the following code will render exactly the same results:
config.xml
content.xml
settings.xml
Notices that the only differences are:
- The pdx:data content is now the path to an external HTML page.
- The attribute isFile is set to true to indicate xmldocx that the pdx:data content is a path rather than HTML code.
HTML code embeded within a Word table
It may well be that we choose not to embed directly the HTML code into the document but rather insert it within another document element like a table or a header/footer.
This can be achieved in a very simple way by setting the rawWordML option to true.
We may modify slightly the previous example:
config.xml
content.xml
settings.xml
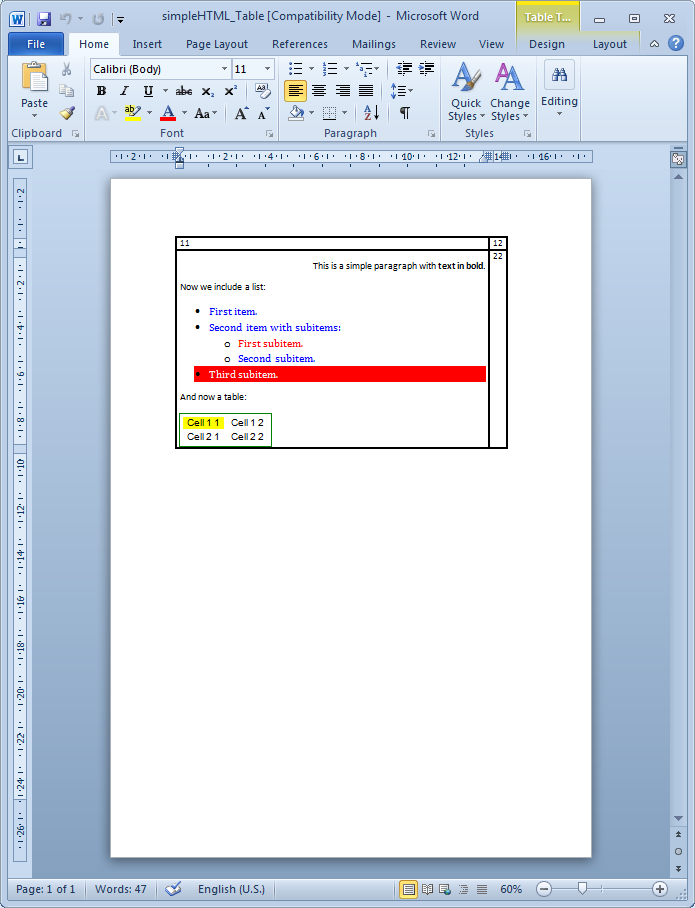
![]() And you will get as a result (download the corresponding document):
And you will get as a result (download the corresponding document):
Embedding images
To include images is equally simple. One may choose to include the images within the document (with the attribute downloadImages set to true) or keep them as an externally linked resource (in that case you should make sure that the image is available to the final users).
A simple example that makes use of this simple web page with an image reads as follows:
config.xml
content.xml
settings.xml
![]() And you will get as a result (download the corresponding document):
And you will get as a result (download the corresponding document):
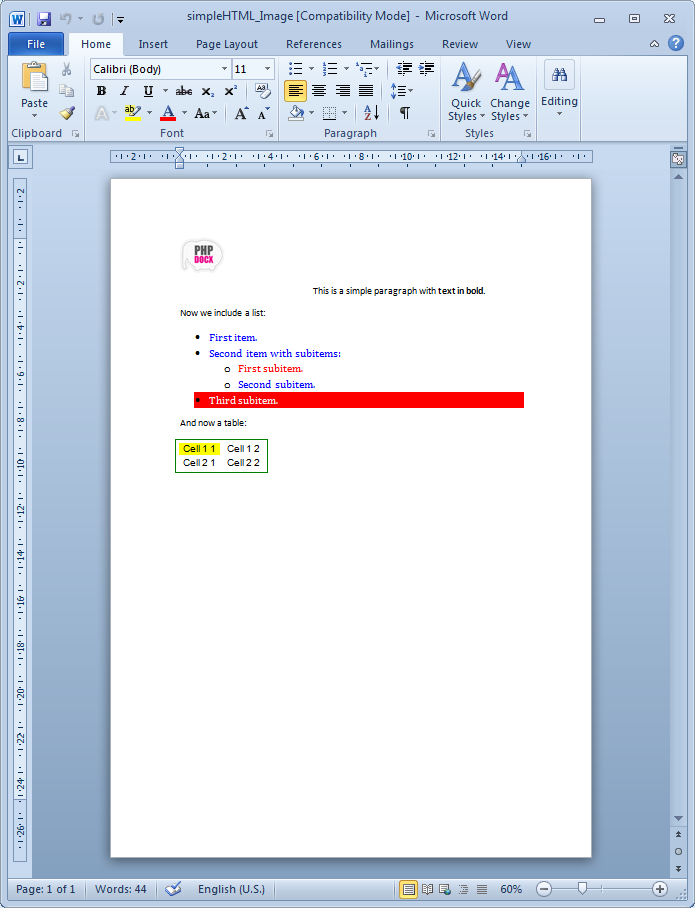
Notice that like in this case we have not declared the width and height attributes of the image, xmldocx reads its properties from the image header and inserts it with a resolution of 96 dpi (default resolution). One may, of course, choose custom width and height to obtain the desired results.
Supported HTML tags and attributes
xmldocx parses all the most commonly used HTML tags and attibutes.
It is important to take into account that the HTML and OOXML that Word is based on have different goals so at some points the translation from one to the other should include certain compromises that are not universally valid for all applications. Fortunately it is not difficult to find convenient workarounds that offer a close to perfect Word rendering.
The list of currently parsed HTML elements include:
Block type HTML elements
-
div: although this tag is probably the most used in modern HTML code it does not have a direct translation into Word.xmldocx offer different parsing options:
- Only use it for the CSS inheritance and parse consequently its child elements.
- Parse them as a "p" element with the option "parseDivs" set to "paragraph"(this may be an useful option when using HTML code coming from a WYSIWYG editor).
- Parse it as a table with the option "parseDivs" set to "table" . This may be the most accurate option if one may decide to preserve all available formatting but may produce complicated Word documents that may be later difficult to edit manually (if that is an interesting option).
- p: this is, of course a native Word element so it is parsed as expected.
- h1, h2, h3, h4, h5 and h6: they are parsed as Word headings and as such they may show up in a TOC included in the Word document.
- ul and ol: are respectively parsed as unordered or ordered Word lists.
- li: are parsed like individual list items belonging to a predefined ordered or unordered list.
- dl, dt, dd: are treated like definition lists in standard HTML.
- table: are, of course, parsed as Word tables and the following attributes are taken into account:border, align and cellspacing. Of course all its child are consequently parsed: thead, tbody, tr, th and td and its corresponding colspan and rowspan attributes.
- img: images are converted into Word images and they can be integrated in the Word document by setting the option "downloadImages" to true or, if prefered, be kept like an external resource (this option could be particularly interesting if we expect the image to change with time), this, of course, requires an open Internet connection whenever the Word document is visualised. Besides the src attribute the width and height are also parsed. All other styling options should be defined via CSS properties.
- br and hr: they include, respectively, a line break and an horizontal ruler in the Word document.
Inline type HTML elements
- a: are parsed as external links, internal links or bookmarks (with the parseAnchors set to true in the last two cases) depending on the value of the href or name attribute.
- strong, b, i, em, u, span, sup, sub, blockquote, address, center, listing, plaintext, xmp, pre, cite, var, dfn, tt, code, kbd, ins, s, strike, del, big, small: are parsed as text with tehir corresponding default properties unless they are overwritten by explicit CSS style properties.
HTML web form elements
-
input: The inputs are parsed depending on their type attribute:
- text: is converted into a Word text field. The size attribute determines the corresponding length in the Word field.
- checkbox and radio: in both cases they are converted into Word checkboxes. The checked is parsed and activates the checked elements in the Word document.
- select and option: They transform into the corresponding Word dropdown field element with their corresponding options. Once again if there is a selected option in the HTML code it appears selected by default in the Word document.
WARNINGS:
That a tag is not parsed does not mean that its content dissapears from the Word document. It only implies that their associated HTML properties are not taken directly into account. Their childs and text content will be parsed and rendered with their corresponding styles into the Word document.
Supported CSS properties
Currently almost all CSS properties, that are posibly applicable to a document, are parsed and translated into their Word counterparts.
In order to achieve the best posible results it is important to know how these CSS properties are applied and their known limitations regarding the final document rendering.
The list of currently parsed CSS styles include:
Border styles and background color
The following border properties are parsed:
-
border: one may introduced combined properies as, for example, "1px solid red". Some comments about units and format:
- Units: one may use pixels, points or ems.
- Styles: the available styles are: none, dotted, dashed, solid, double, groove, inset, outset.
- Colors: one can use hexadecimal values like #ff0000 or, if it exits, standard CSS colors like "red" (standard CSS color names list).
- border-[top, right, bottom, left]: same as above but letting you to choose different borders styles for top, right, bottom and left borders.
- border-[top, right, bottom, left]-color: sets up independently the color for each border.
- border-[top, right, bottom, left]-style: sets up independently the style (solid, dotted, …) for each border.
- border-[top, right, bottom, left]-width: sets up independently the size (in pixels, points or ems) for each border.
- border-collapse: allows for collapse or separate.
- background-color: hexadecimal or standard CSS value.
Margins and paddings
The concept of padding has not a general direct counterpart in Word so it is usually interpreted as extra margin space.
- margin and padding: one may use pixels, points or ems.
- margin-[top, right, bottom, left] and padding-[top, right, bottom, left]: same as above but letting you to choose different margins and paddings for top, right, bottom and left.
Page break properties
This properties are partially supported:
- page-break-after: if set to avoid is equivalent to the Word property of "Keep with next paragraph".
- page-break-inside: if set to avoid is equivalent to the Word property of "Keep lines together".
- page-break-before: if set to always is equivalent to the Word property of "Break page before". If it is set to avoid turns on Word widow/orphan control.
Font and text properties
The units may be pixels, points or ems and the colors follow the same scheme as above. The suported properties include:
- font: if one uses the shorthand prperties one need to preserve the following order: font: font-style font-variant font-weight font-size/line-height font-family.
- font-family: make sure to include a font family that may be supported by the Word interface (practically all the usual ones). The default value is "serif".
- font-size: The default size is 12pt.
- font-style: may be normal, italic or oblique.
- font-variant: may be normal or small-caps.
- font-weight: only recognise bold or bolder that are converted into bold in Word.
- line-height: may be set in any of the available units.
- color: hexadecimal value or standard CSS values.
- text-decoration: may be underline or line-through.
- text-align: the available values are left, center, right or justify.
- text-indent: may be set in any of the available units.
- text-transform: may be set to uppercase.
Positioning
xmldocx tries to adapt as best as posible the positioning properties of elements to equivalent Word properties. If you need to position precisely elements in the resulting Word document the best and simplest way is to use tables.
You may also instruct xmldocx to parse divs as tables (see, for example, above) or to parse floats with the "parseFloats" set to true (image floats are always parsed by default).
In any case results are usually pretty good and cover all but the most sophisticated examples.
The parsed properties include:
- float: can be none, left or right.
- vertical-align: can be given in pixels, points or ems or like super, sub, top, text-top, middle, baseline, bottom and text-bottom.
Lists
xmldocx handles pretty well the rendering f HTML lists and their associated CSS styles. Nevertheless, if you want to use bullets beyond the most standard ones you should the xmldocx embedding HTML element in conjunction with the createListStyle element (by setting the 'useCustomStyles' attribute to true) to obtain the desired results.
In order to do so one should create a custom style that mimics the HTML result and give it the same name that is used in the HTML code for the corresponding class or id attribute. xmldocx will automatically use the corresponding formatting (bullets, indents, etcetera) previously defined by us.
In any case results are usually pretty good and cover all but the most sophisticated examples.
In case that we do not bother to define any custom list style the corresponding CSS list style property is parsed as follows:
- list-style and list-style-type: when any of them is set to none no bullets or numbering is included and the CSS properties on margin and padding are used, for all other lists types the standard Word defaults are used.
Using native Word formatting with HTML
One of the nicest features of the embedHTML element is that it allows to use customized Word formatting for paragraphs and tables.
One may write plain HTML with little or none styling and yet generate a very sophisticated Word document.
The default base template already includes all standard Word styles for headings, paragraphs and tables. You may get all the available styles via the xmldocx parseStyles element.
Of course, yo may use a different base template that better suit your needs or even explicitely import styles from other docx via the xmldocx importStyles element.
Let us now go over a simple example that illustrates this functionality:
config.xml
content.xml
settings.xml
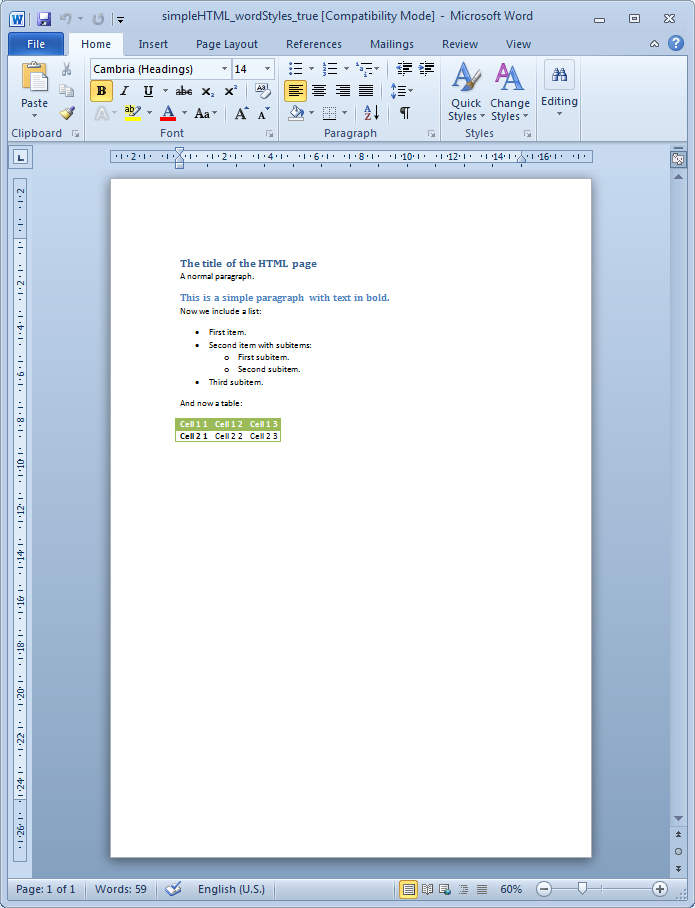
Notice that we have set the option strictWordStyles to true so the HTML parser will ignore the CSS properties and will apply exclusively the selected Word styles.
![]() And you will get as a result (download the corresponding document):
And you will get as a result (download the corresponding document):
If one removes the option strictWordStyles or set it to false (its default value), phpdocx will try to combine the Word and HTML styles.
![]() And you will get as a result (download the corresponding document):
And you will get as a result (download the corresponding document):

Other general options
Besides all the options that have been carefully analysed before there are are other general options that we now pass to comment briefly.
- ‘parseAnchors’ (boolean): if set to true it will parse the anchors included in the HTML file. Its default value is false.
- ‘parseDivs’ (paragraph, table): although all CSS properties of div tags are inherited divs themselves are not parsed by default because there is no WordML element that exactly resemble its properties. When set to paragraph the xmldocx parser tries to parse them as standard paragraphs (this may be an useful option for HTML coming from certain WYSIWYG editors). If set to table renders the div as a Word table. Its default values is false.
- ‘parseFloats’ (boolean): when set to true xmldocx tries to parse the floating divs and paragraphs as floating tables. Sometimes the results are impredictable, so use with care. Its default values is false.
- ‘baseURL’ (boolean): forces the base URL of the relative links to the desired value. This option may be particularly useful if the HTML code is obtained via the PHP file_get_contents method or any similar procedure.
Inserting HTML into Word templates
All the precceding examples have their match in the case we are working with templates by means of the replaceVariableByHTML element.
All the available attributes are the same as before although we have to give two extra pieces of extra info, namely:
- The name of the variable we wish to substitute.
-
The type of substitution that may be:
- block: the whole paragraph containing the variable is replaced by the corresponding HTML.
- inline: only the variable itself is replaced by the ‘inline’ HTML content (block elements are removed from the code).
A simple example will better illustrate all this.
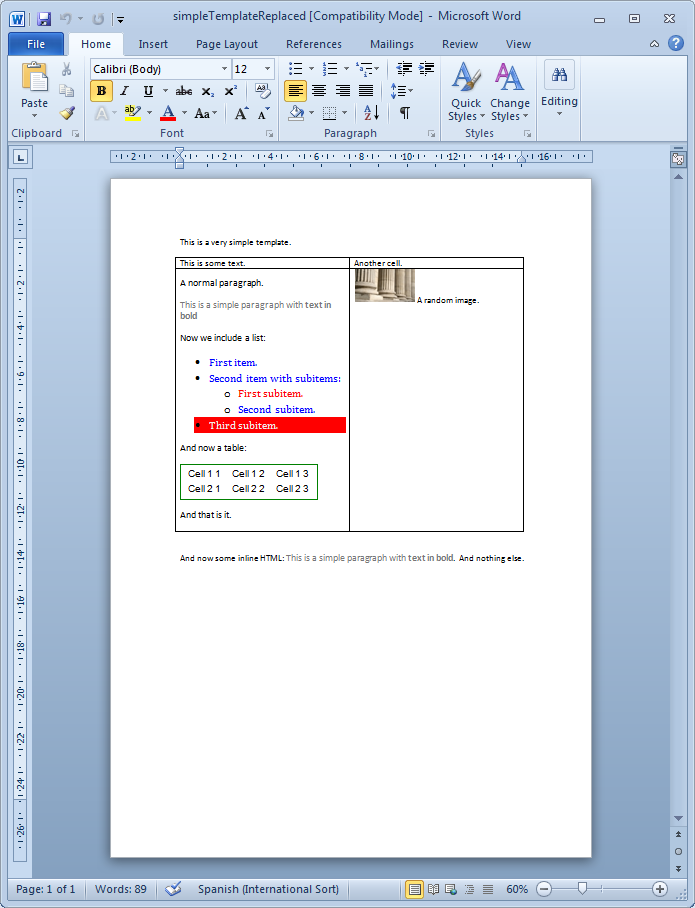
![]() Let us start with a simple template that looks like this:
Let us start with a simple template that looks like this:

The following code:
config.xml
content.xml
settings.xml
![]() Fields (download the corresponding Word document):
Fields (download the corresponding Word document):
HTML Extended
Premium licenses include the HTML Extended mode to invoke xmldocx tags with custom HTML tags.
Thus, it is possible to insert headers, footers, comments, table of contents, cross-references, sections and many other contents. All of it integrated with the supported HTML tags and CSS styles.
An easy example of use of HTML Extended would be the creation of a DOCX with bookmarks, breaks and cross-references:
config.xml
content.xml
settings.xml
All the documentation regarding this feature is available in the HTML Extended page.